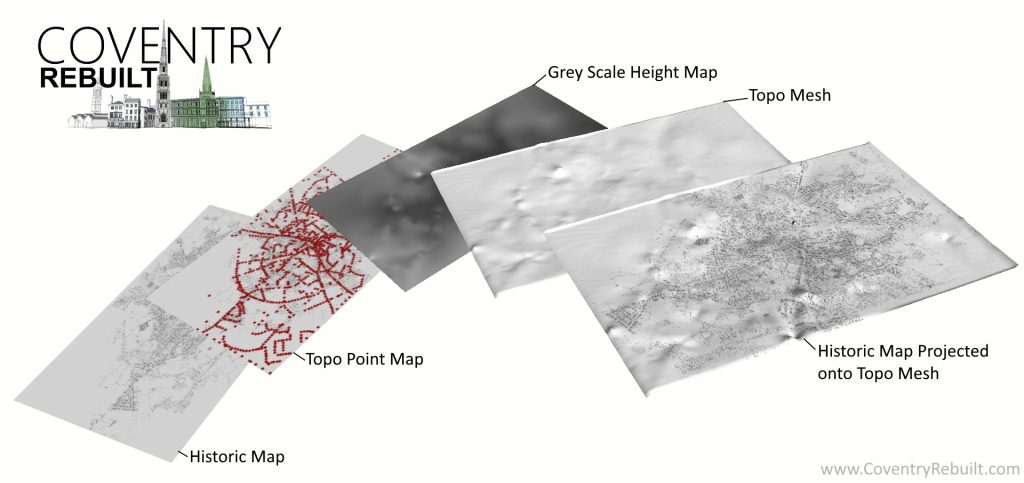
3D Topography from Historic Map
A quick reminder to myself of the method used to map the topography in Coventry Rebuilt (written as notes to myself, might be useful to you, might not – sorry its not a tutorial!). After searching I couldn’t find anything that covered the subject step by step so here are my notes.
Urban topography on a local scale can change significantly in a very short time due to redevelopment (reprofiling / redevelopment). This is important for reconstructing historic models because we can’t rely on modern topographic surveys, no matter how good they are. So, we need to reconstruct historic topography. For Coventry Rebuilt I’ve done this several times trying to increase the accuracy/area with each iteration.
Step 1 - Historic Map
Accurately plot the historic map in mapping software (Mapinfo, ArcGIS, or free version (google free MapInfo alternative)
Step 2 - Topo Point Map
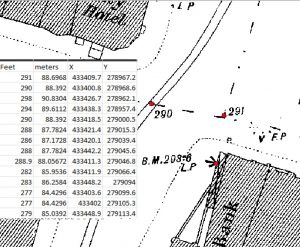
Tedious bit – mark every historic topo survey point, add the attributes of the height (probably in feet), along with the grid reference (this can be automated depending on the software used). Mark the corners of the map with guestimates to prevent odd things from happening later on. Watch out for railway cuttings etc – sudden changes in height. 3 Points one on either side of the embankment and on at the bottom/top – likely need
End result is a table with X, Y, and Z(height) coordinates.
Convert feet to meters (excel formula (=CONVERT (A1,”ft”,”m”)
Option – round numbers up/down
Step 3* 3D Rough and Ready
You can use the topo point map (image) upload to 3D software (Blender / Sketchup etc) and manually construct a 3D mesh. Pros – Quick Cons – triangles, coarse, only works well for very small areas. Useful to rough out areas but don’t rely on this approach!
Step 3 Grey Scale Height Map
It is possible to make a 3D mesh in some mapping software.. however, the approach I’ve taken relies on a greyscale heat map. In the mapping software construct a contour (raster) map from the topo point map. Alter the grading to match the scale of the historic map survey i.e. 290 ft, 291 f t = 1-foot difference ~ roughly 30cm so each shade should be for a 30cm interval.

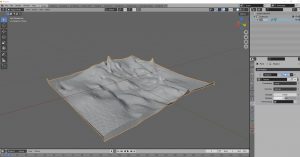
Step 4 Topo Mesh
Step 5 Historic Map Projection
Can project the texture of the historic map in blender. Or for me, I’m exporting the mesh to sketchup, and cutting the mesh up into tiles that match the historic map then projecting the map onto the tile.
Small scale local changes in the mesh need to be applied – railway cuttings etc which can be done manually vector by vector once the map is applied as a reference..
For CRB the topography changes significantly in the 1930s, 1950s, and 1970s, also I’ll need to consider matching with modern topography…
Wittering
Can project the texture of the historic map in blender or exporting the mesh to sketchup, and cutting the mesh up into tiles that match the historic map then projecting the map onto the tile.
Small scale local changes in the mesh need to be applied – railway cuttings etc which can be done manually vector by vector once the map is applied as a reference..
For CRB the topography changes significantly in the 1930s, 1950s, and 1970s, also I’ll need to consider matching with modern topography…